How to Set Up and Use Dynamics NAV Web Services
Version: 5/29/2014
While it’s possible to connect to the native NAV database directly using OBDC, Dynamics NAV web services allow you to use expose existing codeunits and pages and then make use of the validation and C/AL code that these objects provide. Pages (and the tables they’re based on) exposed as web services provide Create, Read, Update, Delete and filtering methods via a SOAP (Simple Object Access Protocol) endpoint. The WSDL (Web Service Definition Language) file exposed by the web service also can be imported into Visual Studio to assist in the creation of classes and methods that can be used to get data from the NAV database. Connecting to a web service is more difficult without using Visual Studio, because other languages (like PHP) don’t natively support SOAP or WSDL. Because web services can be consumed by both internet and internal desktop-based applications, web services can be a good way to add custom functionality to Dynamics NAV without modifying NAV objects and code.
In order to use web services, the “Microsoft Dynamics NAV Business Web Services” Windows Service must be running. This service can only connect to SQL server NAV databases, so in order to use web services, you must first upgrade a native database to a SQL database. Navision Classic forms and reports can still be used after the conversion to SQL by using the “Classic Client for SQL Server” executable instead of the Role-Tailored Client.
Overview:
Convert Native Navision Database to SQL Server Database:
Step 1: Install SQL Server 2012
Step 2: Run migrate.fob codeunit (using classic client) to check for invalid dates
Step 3: Install the components of NAV 2009 needed for web services
Step 4: Create a backup of the database in the classic client, and restore it into the classic client w/ SQL
Step 5: Recompile objects
Publishing Web Services:
Step 1: Edit CustomSettings.config to use the right database, and start the Windows service
Step 2: Check that the service is running via web browser
Step 3: Use the “Web Services” table to publish a Page or Codeunit
Connecting to Web Services:
Step 1: Add Service Reference in Visual Studio
Step 2: Modify basicHttpBinding so that it can connect to NAV
Convert Native Navision Database to SQL Server Database:
Step 1: Install SQL Server 2012
With the version of SQL Server Express included in NAV 2009, the maximum database size is 4 Gigabytes. Before proceeding with the upgrade, install a full version of SQL Server, or more recent version of SQL Server Express, which allows for databases up to 10 Gigabytes in size.
The latest version of SQL server approved by Microsoft to work with NAV is SQL Server 2012.
Evaluation can be downloaded at:
http://www.microsoft.com/en-us/download/details.aspx?id=29066
http://technet.microsoft.com/en-us/evalcenter/hh225126.aspx
(Second link is faster, but requires downloading a download client.)
When installing, install the following components: “Database Engine Services”, “Client Tools Connectivity”, and “Management Tools – Complete”
More information here: http://msdn.microsoft.com/en-us/library/dd568708.aspx
Additional configuration may be required if the NAV Server and Database Server are on different computers: http://msdn.microsoft.com/en-us/library/dd568739.aspx
Step 2: Run migrate.fob codeunit (using classic client) to check for invalid dates
Before the NAV database can be backed up and restored into SQL, you need to check your database for fields that are invalid in SQL, or the import will fail. This check (and resulting fixes) can be performed using the migrate.fob codeunit contained in the “Upgrade Toolkit” folder on the NAV installation DVD. Note that running the migrate.fob codeunit requires use of a developer’s license. Running the codeunit on our database with about 17,000,000 records took about 12 hours. An overview of how to use this codeunit can be found here:
http://saurav-nav.blogspot.com/2012/12/nav-2013-upgrade-part-iv-sql-migration.html
While running the codeunit on our database, the codeunit would stop running and exit when it checked a certain record and display the error “Not a valid date.”. We were able to work around this problem by running the codeunit in Debug mode, so that we could identify the record that was causing the problem, and manually delete it. This problem was possibly caused by data corruption.
Step 3: Install the components of NAV 2009 needed for web services
Run setup.exe on the NAV install DVD and make sure the following components are installed: “Server”, “SQL Server Option”, “Classic Client”, and “Database Server”.
Step 4: Create a backup of the database in the classic client, and restore it into the classic client w/ SQL
In the classic client, create a backup of the database (Tools->Backup). Then run the Classic Client with SQL Server as Administrator, create a new database (File->Database->New), making note of the name you give it, and then restore the backup into this new database. (Tools->Restore.) You should have the same functionality as you had in the Classic client with the native database.
Step 5: Recompile objects
In the following steps, if you receive errors about NAV not being able to locate a certain object, you may need to recompile that object.
Publishing Web Services:
Step 1: Edit CustomSettings.config to use the right database, and start the Windows service
By default, the NAV Business Web Services Windows service will either expose the Demo database as a web service, or nothing. In order to tell the Windows service to use our new SQL version of our NAV database, we edit the CustomSettings.config file, which is found at C:\Program Files (x86)\Microsoft Dynamics NAV\60\Service. To edit it, you will need to run notepad (or other text editor) as an administrator. Change the key below to contain the name of the database you just created:
<add key=”DatabaseName” value=”your-database-name-here”></add>
Then stop and start both of the Dynamics NAV Windows services together. (“Restart” doesn’t seem to work).
Step 2: Check that the service is running via web browser
If you open http://localhost:7047/DynamicsNAV/WS/services in your browsers, you should see an XML document showing the services published. http://localhost:7047/DynamicsNAV/WS/SystemService can be used to find the different companies in the database. Other services will be located at URLs like http://localhost:7047/DynamicsNAV/WS/Page/Customer, but first you must publish these objects.
The web services server is running (by default) on port 7047, while the server used by the Role-Tailored Client is running on port 7046.
Step 3: Use the “Web Services” table to publish a Page or Codeunit
Web services can be published using the Classic client (for SQL), the Role Tailored Client is not required, as long as you have table 2000000076, “Web Service”. Run the table in Object Designer, and enter the Object Type and ID, and check the “Published” Box. The name you give the service is how it will be accessed via URL, NOT the name of the object being published. Pages can be easily created to expose certain fields of existing tables.
The service should now be listed at http://localhost:7047/DynamicsNAV/WS/services.
Connecting to Web Services:
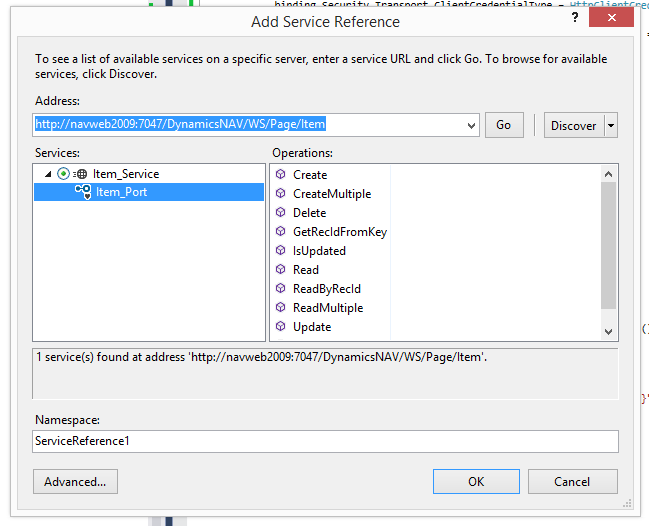
Step 1: Add Service Reference in Visual Studio
Using the “Add Service Reference” functionality of Visual Studio loads the class names and function names from the WSDL provided by the web service endpoint, but it doesn’t properly configure a httpBinding so it can connect to NAV. First, add the Service Reference (Project->Add Service Reference) as shown in the image below:
The Service Reference is now available in the “Services Reference” folder of you solution, and can be used with the using <project name>.<reference name>; directive. Take note of what you named the service reference.
Step 2: Modify basicHttpBinding so that it can connect to NAV
The following C# code creates a client to NAV that can be used to perform Read, ReadMultiple, Create, Delete, etc functions. A separate client is created for each NAV service.
In this example, the name of the web service (created in NAV) is “Item”, and the name of the service reference (created in Visual Studio) is “ItemReference”.
using <project-name>.ItemReference;
BasicHttpBinding binding = new BasicHttpBinding();
binding.Security.Mode = BasicHttpSecurityMode.TransportCredentialOnly;
binding.Security.Transport.ClientCredentialType = HttpClientCredentialType.Windows;
ItemReference.Item_PortClient client = new ItemReference.Item_PortClient(binding, new EndpointAddress("http://localhost:7047/DynamicsNAV/WS/<your-escaped-company-name>/Page/Item"));
client.ClientCredentials.Windows.AllowedImpersonationLevel = TokenImpersonationLevel.Delegation;
Examples of how the client can be used:
http://blogs.msdn.com/b/freddyk/archive/2010/01/20/connecting-to-nav-web-services-from-c-using-service-reference-code-version.aspx / blog with demo c# application
http://msdn.microsoft.com/en-us/library/dd355316.aspx / walkthough with non-working code on how to create and use a page web service
http://msdn.microsoft.com/en-us/library/ff477110.aspx / how to use the “ReadMultiple” operation